Creating Rollovers
A rollover is an image which changes in some way when the user's mouse pointer passes over it. It is most often used as an interactive device as part of a site's navigation buttons. Stereotypically the button may appear to light up or squash to indicate a link. If the user chooses not to click the link, the first image is usually restored once the mouse pointer has passed over it. Note that these do not work with most touch screen devices (iPad, iPhone, iPod touch, and probably Android/Blackberry/Windows smartphones and tablets too) as the code is not triggered to show the second image.
Dreamweaver is far more than just a tool for producing html (hyper text markup language). Rollovers make use of the JavaScript language, and Dreamweaver makes this possible for non-programmers too by writing the code for you.
To create a rollover you will first need a pair of images in .gif, .jpg or .png format (you can mix and match formats, and gifs can be animated. There are a few examples on my son's first homepage at http://www.jednet.co.uk/jamie
Click here for a pair of images you can download to practice with. Your images should be the same width and height (measured in pixels), or else JavaScript will resize the second image to match the first, even if this distorts the second image beyond recognition. Then choose 'Insert Image Objects > Rollover Image' from the Insert menu, or just click on the symbol for this from the Common panel of the Insert palette, you even drag it to where you want the rollover to be inserted, once you've done one and the symbol has replaced the usual 'Image' tree symbol in the palette.

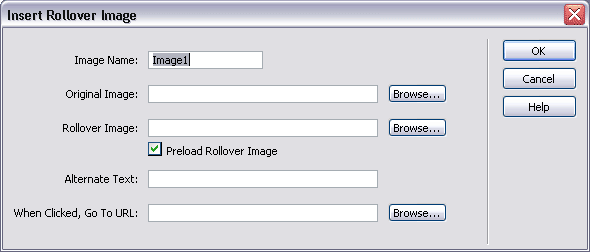
Original Image: Then fill the Original Image box by browsing for the image that you want displayed when the page is first displayed. This original version is also called the 'off', the 'up' or the 'static' state.
Image Name: The JavaScript requires that each time an image is used on your page it has a unique name, so Dreamweaver conveniently names it for you as Image 1 - you can rename this now or from the Properties Inspector later, or just leave it be.
Rollover Image: Next browse for your Rollover Image. This is your 'on' or 'over' state.
Link or When clicked, go to URL: (URL = Uniform Resource Locator, the official term for a web page address). The JavaScript is attached to a web link associated with the first image - even if you just want a graphic effect, there must be a link. This can be an absolute address such as http://www.jednet.co.uk/jamie which can link to an external page on someone else's site or a relative link to within your own site. Dreamweaver will put in a # hash symbol as a blind link for you if you do not specify a real link of your own. You can go back and change this link afterwards from the Properties Inspector, but if you simply delete the # hash and leave the link empty your JavaScript will break. (Some American authors call the # hash sign 'pound').
Preload Rollover Image: Usually you will want to preload your second image to give a good response - otherwise there will be a delay while the browser calls back to the server when it needs the second image state. There is a special case when this may not apply. The rollover image does not have to be a simple unmoving picture - it can be an animated gif. If this is set to loop then it should still be preloaded. If set to play only once or a few times, it will have likely stopped moving long before anyone invokes it, so then DON'T preload. This is also true if it relates closely to the original image and must be seen from frame 1 rather than viewed from any point in the animation.
You cannot preview your rollover in Dreamweaver so press function key 12 (F12) to switch into your browser. When you come back to Dreamweaver press F10 to view the source code and see how much JavaScript has been written for you.
Dreamweaver can take rollovers to the next level with a function which will create an entire Navigation Bar. This can even automate the production of a table into which the buttons will be ordered. It allows each of the buttons to show a different look for up to FOUR states. In addition to the 'up' and 'over' states used for simple rollovers as detailed above, it allows for extra images to represent 'down' for when the user has their mouse button depressed and the rare 'over while down' when the pointer is over the image after it has been clicked. Complex rollovers where more than one area of the page change on mousing over something are often easier to create in a Web graphics application such as Adobe Photoshop or Fireworks using 'slicing'. You can save from these an html page containing a table, together with all the graphics in their various rollover states. Here's one I created earlier...
Note that it is possible to create simple two stage rollovers in html without the large chunk of JavaScript that Dreamweaver inserts. Much of the JavaScript relates to preloading the rollover second state for instant response. Here is a simple html rollover, the code can be copied by viewing the source. The problem with this code is a slight delay before the rollover takes place due to the browser having to call back to the server for the second image.
The latest trend is to create both the original and over states as a single graphic which is then moved up or down with CSS while just half is visible - easier to keep track of the graphics and guarantees that the over state will load without having to include the cumbersome preload code: www.elated.com/articles/css-rollover-buttons/
Dreamweaver also makes 'Flash' buttons easy to create. These can have sounds attached and can look very good - unless your user lacks the Flash plug-in: in which case your site just lost its navigation (Apple IOS devices - other than computers running Mac OS - don't support Flash, and it is doubtful on other smartphones and TVs etc. It's good practice to offer alternative simple text links at the bottom of the page).