Dreamweaver
DHTML Dreamweaver
DHTML
Dynamic HyperText Mark-up Language
using Timelines
DHTML describes
a combination of HTML, JavaScript and Cascading StyleSheets (CSS) and
needs version 4 browsers or later. The word 'dynamic' can mean different things in other web-related contexts. (Don't confuse Dynamic HTML with the idea of a dynamic web page, which means a web page generated dynamically by server-side code before being served to a visitor).
Using
timelines we can move layers, even follow paths; show, hide and reorder
layers; or swap images. Items can change at a predetermined time when the timeline has been set to 'autoplay', or in
response to user input such as clicking a button. To open the Timelines
palette select it from the Window menu. in some versions of Dreamweaver Timelines is hidden in the sub-menu 'Others' (or even left out altogether in MX 2004 until you download the 7.01 updater).
A quick-and-dirty technique to move a layer and its contents around the page is to select the AP Div layer and then from the menu choose Modify>Timeline>Record Path of AP element.Then just drag your layer around the page. It should leave a grey trail showing the path the layer will take. Ensure that you click 'autoplay' and perhaps 'loop' too - see Autoplay below for more information.
Adding a layer to a timeline is
as simple as dragging it to the Timelines palette. Be careful to drag the layer's top left tab - it is too easy to accidentally drag just an image from the layer.
You cannot move an image - instead you move the layer it is on. You can exchange an image for another one at any keyframe to create a simple slideshow effect by selecting a different image from the Src attribute for the image on the Properties palette: 
 Moving a layer Moving a layer
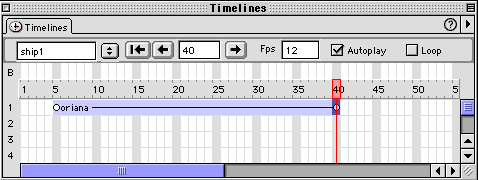
The
first white circle signifies the start keyframe of your animation, the
last marks the end keyframe. Click on the second so the pink 'scrub bar'
moves to it, and then position your layer where you want it to stop. Alternatively
enter a position into the properties inspector - if you enter a negative
value next to the L for Left, the layer will be off the left edge
of the page (or if you enter a negative value in the T box, it will be
off the top). It is harder to position it off the right hand side or bottom because
of variations in the user's screen resolution - a Left value (L)
of 801 pixels will be off screen those with small monitors set to 800 x 600 pixels, but not for those with
screens running at 1024 pixels or more...

The duration
of your animation is dependent on the number of frames between the keyframes, divided by the framerate.
Drag the end keyframe to the right to prolong the action. How long the
animation takes is the result of dividing the number of frames by the
Fps - the framerate, measured as Frames per second. In the
above example, where the animation starts at frame five and ends on frame
40, the animation would take place over 40-5 = 35 frames, and take just
under 3 seconds (number of frames 35 divided by Fps 12).
>The default
Fps value of 15 is that recommended by Adobe/Macromedia, larger values may give smoother animation on a good PC but slower
connections or older PCs may struggle to keep up with values greater than
15. Slower rates may look jerky.
Autoplay
and Loop
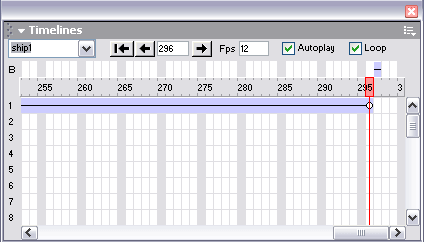 Note
the tick in the Autoplay box - if that is not ticked, your animation
will not run! Leave it unticked only if you set up a button or other method
for the user to start the animation. Note
the tick in the Autoplay box - if that is not ticked, your animation
will not run! Leave it unticked only if you set up a button or other method
for the user to start the animation.
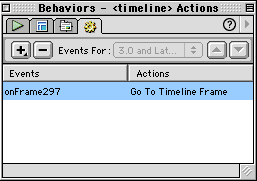
If you want
the animation to repeat, also tick the Loop box. This will insert
a dash in the top timeline to show that a Behaviour has been added.
Edit this by double-clicking the dash, so you can set the number of cycles.
Use restraint! Movement adds interest and used well will draw attention
to where you want it to be given, but there are few excesses in web design
more annoying than a page of unceasing, frenetic animations, all competing
for a visitor's attention.
more on timelines from Adobe/Macromedia
|