
 |
A rollover is an interactive image which changes when the user's mouse pointer passes over it. By adding a link it is often used as part of a site's navigation buttons or menu. The button may appear to light up or squash to indicate the link is present. If the user chooses not to click the link, the first version of the image is usually restored once the mouse pointer has passed over it. Note that 'rollover' does not work with most touch screen devices (iPad, iPhone, iPod touch and Android/Blackberry/Windows tablets & smartphones) as there is no 'hover' state to show the second image, although it will appear and stay down once tapped). |
Dreamweaver does much more than produce html (hyper text markup language). Rollovers make use of the JavaScript language, and Dreamweaver makes this easy for non-programmers by writing an impressive amount of code for us. Look in code view: there will be a lot of <script> in the header plus some onmouseover=MM_swapImage code at the point in the main body that your rollover will appear.
|
To create
a rollover you will first need a pair of images in .gif, .jpg or .png
format You can mix and match formats, and gifs can be animated  , but ideally they will be the same proportions and size - the 'over' version of the image will be resized to match the first image. , but ideally they will be the same proportions and size - the 'over' version of the image will be resized to match the first image. |
In Dreamweaver versions prior to CC 2015 choose 'Insert > Image Objects > Rollover Image' from the Insert menu. Dreamweaver CC 2015 and later add rollovers via 'Insert > HTML > Rollover Image' from the Insert menu.

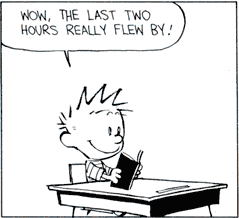
image credit:Ben Pleysier
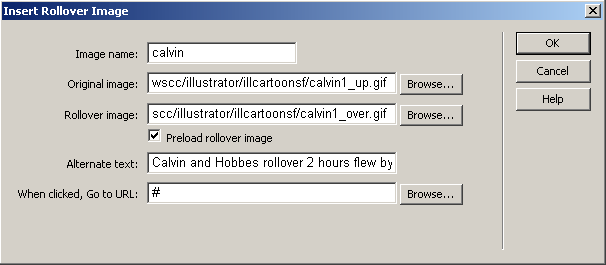 |
Image Name: The JavaScript requires that each time an image is used on your page it has a unique name, so Dreamweaver conveniently names it for you as Image 1 - you can rename this now or from the Properties Inspector later, or just leave it be. I have renamed it 'calvin'.
Original Image: Then fill the Original Image box by browsing for the image that you want displayed when the page is first displayed. This original version is also called the 'off', the 'up' or the 'static' state.
Rollover Image: Next browse for your Rollover Image. This is your 'on' or 'over' state.
Link or When Clicked, Go To URL: (URL = Uniform Resource Locator, the official term for a web page address). The JavaScript is attached to a web link associated with the first image - even if you just want a graphic effect, there must be a link. This can be an absolute address such as http://www.jednet.co.uk/corben which can link to an external page on someone else's site or a relative link such as ../../corben to within the same site. Dreamweaver will put in a # hash symbol as a pretend link for you if you do not specify a real link of your own. You can go back and change this link afterwards from the Properties Inspector, but if you simply delete the # hash and leave the link empty your JavaScript will break. (Some American authors call the # hash sign 'pound').
Preload Rollover Image: Usually you will want to preload your second image to give a good response - otherwise there will be a delay while the browser calls back to the server when it needs the second image state. There is a special case when this may not apply. The rollover image does not have to be a simple unmoving picture - it can be an animated gif. If this is set to loop then it should still be preloaded.
If set to play only once or a few times, it will have likely stopped moving long before anyone invokes it, so then DON'T preload. This is also true if it relates closely to the original image and must be seen from frame 1 rather than viewed from any point in the animation.
To preview your rollover in Dreamweaver you will need to View > Toggle Live View or press function key 12 (F12) on Windows (Macs use it for volume) to switch into your browser.
Dreamweaver versions prior to CS4 could take rollovers to the next level with a function which will create an entire Navigation Bar. This could even automate the production of a table into which the buttons will be ordered. It allows each of the buttons to show a different look for up to FOUR states. In addition to the 'up' and 'over' states used for simple rollovers as detailed above, it allows for extra images to represent 'down' for when the user has their mouse button depressed and the rare 'over while down' when the pointer is over the image after it has been clicked. Complex rollovers where more than one area of the page change on mousing over something are often easier to create in a Web graphics application such as Adobe Photoshop or Fireworks using 'slicing'. You can save from these an html page containing a table, together with all the graphics in their various rollover states. Here's one I created earlier...
![]() The latest trend is to create both the original and over states as a single graphic which is then moved up or down with CSS while just half is visible - easier to keep track of half as many button graphics and no need for cumbersome 'preload' code: www.elated.com/articles/css-rollover-buttons/
The latest trend is to create both the original and over states as a single graphic which is then moved up or down with CSS while just half is visible - easier to keep track of half as many button graphics and no need for cumbersome 'preload' code: www.elated.com/articles/css-rollover-buttons/